Netgear Nighthawk Extenders
With today’s digital needs, a network to connect your computers and other devices has become critical in everyone’s home. While it’s best to have all of your devices connected to internet for an optimal experience, there are plenty of situations where there are obstacles to this. That’s where you need one of the best WiFi range extenders like the Netgear Nighthawk extender series. A good Netgear Nighthawk WiFi extender adds more internet coverage to your home, but the best ones also bring reliability to the table.
Netgear WiFi Extender Setup
- Open a computer or mobile device.
- Launch a web browser.
- Visit www.mywifiext.net. The NETGEAR installation assistant displays.
- Follow the prompts.
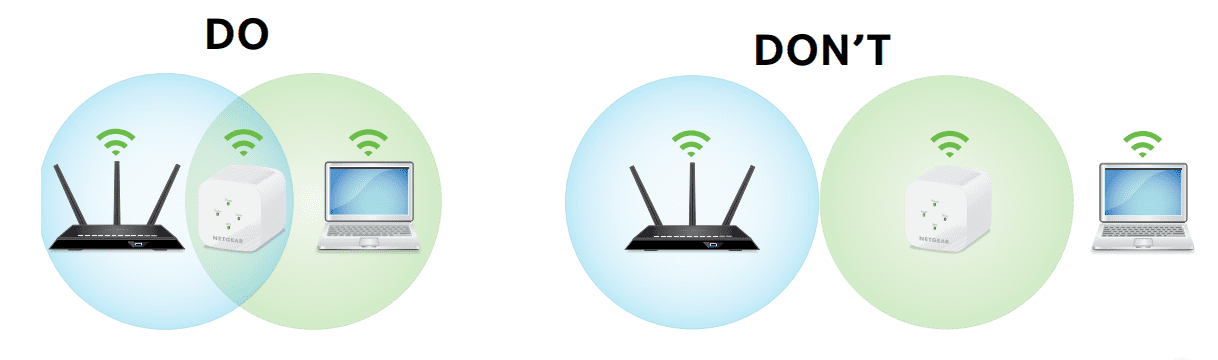
- Unplug the extender and move it to a new location about halfway between your router and the area with a poor WiFi signal.
How to Log in to Mywifiext.net Setup page?
Netgear WiFi Extender can be installed with the two methods, manual setup using mywifiext.net or WPS setup. Mywifiext.net is a web-based Netgear Nighthawk setup URL for your extender. Open a browser and visit www.mywifiext.net website. A new window i.e. New Extender Setup will come up. Follow the on-screen instructions for easy installation. Mywifiext web page can be also accessed using its IP (192.168.1.250), Follow the steps below to log in to Nighthawk Extender Setup page.
- Open any web browser like Google Chrome or Firefox.
- Navigate to the web address bar on the browser.
- Type mywifiext.net on the address bar.
- New extender setup button will appear and click on it.
- Create an account now and hit on Continue button to open Netgear nighthawk setup page.
- The web page can be accessed for several settings that can be done for the Extender.
Note: nighthawksetp.com provides assistance for router setup-related issues. If you need any help, you can anytime.
Get in touch with the experts.
What to do When Netgear Nighthawk Setup page is not Loading?
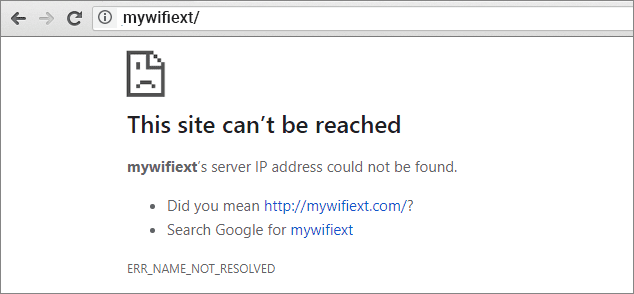
Mywifiext.net is a default web address to open up the Netgear Nighthawk Extender Setup page. But sometimes, the page is not showing any setup page. Instead, you see a website with a normal page or an error on the page. Check your network cables if they are connected to your WiFi Modem correctly. Check if your modem is working well. All the lights (at least 4) are glowing.
Note: These steps can also be used if you’re unable to connect to the Netgear WiFi extender setup manually (not via WPS), even though your Extender connected successfully to AP using the WPS button.
Some of the Best Features of Nighthawk Extenders
Dual-band Netgear Nighthawk WiFi extender is able to catch the signal from the router and broadcast it with minimal interference. This is because they use one band to intercept the signal from the router and a separate one to permeate it throughout the house. On the other hand, single-band extenders attempt to do all this on one band, which can result in weak signal strength and interference from other devices operating and transmitting on a similar frequency.
Freely roam around your home with uninterrupted streaming and downloading. Nighthawk Extenders will seamlessly pass your WiFi connection between the router. One SSID simplifies your network for a better networking experience. Simply add the WiFi Mesh Extender to your existing router. It works with any router, gateway, or rented ISP gateway.
Extenders are categorized by alphanumeric labels called protocols which help signify the device’s capabilities. For example, the Nighthawk WiFi extender with a protocol of “802.11ac” is an AC device. As it stands, AC is one of the best protocols for routers and extenders according to the Institute of Electrical and Electronics Engineers (IEEE) Standards Association. Netgear Nighthawk WiFi extenders are meant to use this protocol since your everyday devices – smartphones, computers, gaming consoles – all use AC protocols.
MU-MIMO is short for Multiple User, Multiple-Input, Multiple-Output. Believe it or not, routers and extenders don’t necessarily stream to multiple devices simultaneously. Rather, they switch among various devices in use, so fast you usually don’t notice. However, if you use four or five WiFi-enabled devices simultaneously, Nighthawk extender will make them share the same stream which results in slow internet. This is not the case with MU-MIMO extenders, they separate bandwidths into up to four streams, transmitting to multiple devices simultaneously.
Netgear Nighthawk Router Setup
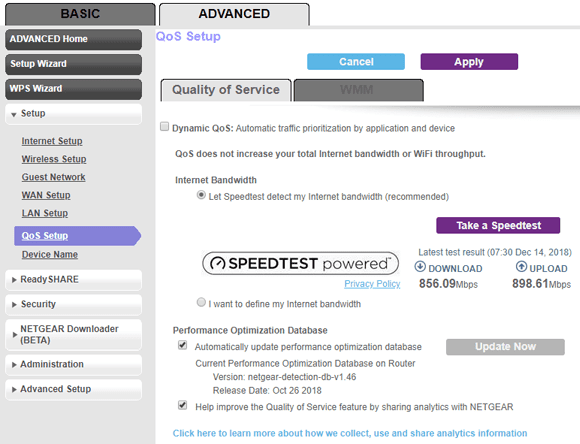
Netgear Nighthawk Routers are built to handle all your high-bandwidth online activities with features that will keep you connected at top speeds. Nighthawk has also downstream QoS and is optimized for streaming applications like YouTube, Netflix, and others, so you can enjoy seamless video streaming with limited buffering. After Nighthawk Router Setup, you can enhance WiFi speed by up to 100%, so you can roam freely throughout your home without fear of slow or dropped connections.
Routerlogin.net is the web interface that deals with the admin Netgear Nighthawk router login and configuration process. You can configure, customize, control, monitor, and even repair your network on your own with the help of the Setup Wizard. After successfully performing the Netgear router login, you can easily set up your Nighthawk WiFi Router. A Nighthawk WiFi Router can be set up in two modes: Router Mode and Wireless Repeater Mode.
Netgear Nighthawk Router Setup in the Router Mode
Follow the steps mentioned below for Netgear Nighthawk Router Setup in the Router Mode.
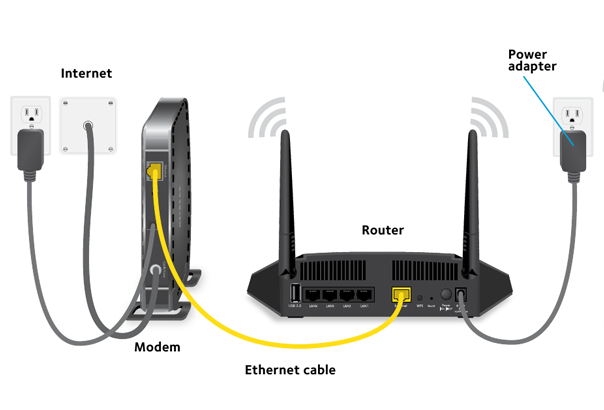
- Remove the antenna caps from the antenna ports on the router.
- Now connect an Ethernet cable from the Internet Modem to your WiFi router.
- Now open routerlogin.net on your internet browser.
- The Netgear Router Login page will appear. Enter the details and hit Log In.
- This way you will be able to login to Nighthawk router.
- Next, select the Router Mode.
- You will see a Netgear genie setup wizard on your computer screen.
- Now, follow the on-screen steps to setup your Nighthawk WiFi router.
Now, your Nighthawk router will reboot and enter the Router Mode.
Netgear Nighthawk Setup as a Wireless Repeater
To perform the Netgear Nighthawk setup in the Wireless Repeater mode:
- Make sure that your router is turned on properly.
- Launch an internet browser from a computer.
- Visit routerlogin.net. If routerlogin.net not working for you, contact our experts and fix the issue in minutes.
- Enter the default Nighthawk router login username and password.
- Next, click on the login button to login to Nighthawk router.
- Once logged in, Netgear genie setup page will display.
- Click on the Wireless Repeater option.
- Type the IP address of the repeater router.
- Now, proceed further with the on-screen setup steps.
- At last, click Apply.
In this way, you can set up your Nighthawk Router as a Wireless Repeater. If you experience any type of issue during Netgear Nighthawk Router Setup, feel free to get in touch with our experts via email, or live chat at any time. They will resolve all your technical issues in an instant.
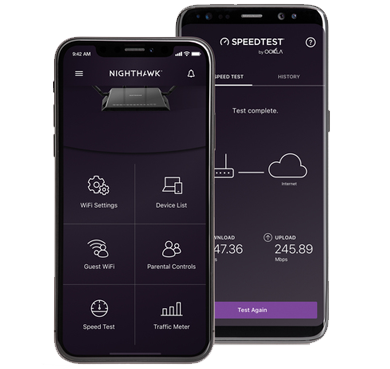
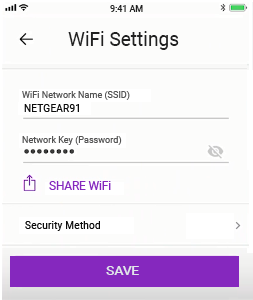
Netgear Nighthawk App
Netgear Nighthawk App (formerly Up app) makes it easy to set up your router and get more out of your WiFi. With the app, you can install your WiFi router in a few steps. Once set up, you can use the intuitive dashboard to pause the Internet on your connected devices, run a quick internet speed test, and much more. Netgear Nighthawk App is a complete upgrade from the legacy genie app. New features are consistently being added. It can also be said as Netgear Router App.
You can use routerlogin.net or routerlogin.com to login to Nighthawk router. Alternatively, Netgear also allows you to manage and monitor the router using the Router app.
Netgear Nighthawk Router Setup Using the Netgear Nighthawk App
You can use the Nighthawk app to perform the Netgear Nighthawk router setup. This app is available for both iOS and Android.
Let’s see how you can complete your Netgear Nighthawk setup and login to Nighthawk router using the router app:
- Attach the provided antennas to your Nighthawk router.
- Afterward, connect the modem to the internet port on your router.
- Click on the download button to get the Nighthawk app on your device.
- Enter your password.
- Open the Netgear Nighthawk app.
- Perform the Nighthawk router login process.
- Follow the on-screen instructions to install the router.
Thus, you can complete your Netgear Nighthawk router setup using the router app. On the off chance that you fail to download the Nighthawk app, contact our experts.
Troubleshooting: Nighthawk Router Not Working
Follow these necessary Netgear Nighthawk troubleshooting steps to resolve the Nighthawk router not working. Start with resetting the router. A simple reboot can fix the Netgear Nighthawk not working error most times. Reboot does not work? Then you must follow the Netgear Nighthawk troubleshooting steps mentioned below:
Getting Netgear Nighthawk firmware update can also helo you fix the Netgear Nighthawk not working issue. To get the latest Netgear Nighthawk firmware update, all you can do is log in to your extender via mywifiext.net and under the Settings option check if any new firmware is available for your device. If you find that a new Netgear Nighthawk firmware update is available for the extender model you have, get it by hitting the Firmware Update button.
This is another Netgear Nighthawk troubleshooting trick you can try to fix Netgear Nighthawk not working issue. Use the hard reset and the soft reset option to get rid of the Nighthawk router not working problem. Let’s try with the soft reset part. You can soft reset your Nighthawk router through the default Netgear router login web page. Reset your Router by placing the proper username and password.

In many cases, trying to reset your router can go wrong if you don’t know the proper steps to login to Nighthawk router. Since it is a bit tricky, you can always get assistance from highly trained professionals.
So if the soft reset did not work, you must not panic. Try out the hard reset format to fix the problem forever. For the hard reset, locate the reset key which is resting at the back of your router. Press the reset key for a few minutes. See if the lights are still blinking or not.
If the above-given Netgear Nighthawk troubleshooting tricks didn’t work for you, consider contacting our technical experts for quick assistance.
Facing Issues with Your Netgear Nighthawk?
Many users come across various issues while using their Netgear Nighthawk devices. Given below are some of the most common queries that our experts handle on a daily basis:
- Nighthawk router not showing WiFi
- Nighthawk router flashing orange
- Router keeps losing internet
- Nighthawk router not working with new modem
- Extender not connecting to iPhone
- Netgear extender IP conflict
- Netgear Nighthawk router not reading USB
- Can’t log into Nighthawk router
- Router not showing all devices
- Nighthawk router not supported
- Router keeps changing IP address
- Nighthawk router is offline
- Nighthawk router isn’t working
- WiFi extender keeps saying no internet
- Nighthawk extender keeps asking for login
- Netgear Nighthawk router keeps crashing
- Nighthawk router not getting full speed
- Nighthawk router can’t connect
- Extender password not working
- Netgear Nighthawk extender not found
- Netgear Nighthawk extender not accepting password
- Netgear WiFi extender getting hot
- Netgear Nighthawk extender 5ghz not working
- Netgear extender poor signal
- Extender won’t turn on
- Netgear extender can’t connect to the internet
If you come across any of the aforementioned issues, ping our experts and get rid of the problem within a matter of minutes.
Netgear Nighthawk FAQs
My extender won’t turn on. What to do?
The primary reason why your extender is not turning on might be an insufficient power supply. So, check whether the wall socket into which you’ve plugged your extender is in working state or not. If not, either get it repaired or consider plugging the extender into another outlet.
Can I use two extenders at the same time?
Yes, you can configure two extenders at the same time. By doing so, you will be able to blanket the dead zones with high-speed WiFi more effectively. But, make sure that there is no wired connection between both the extenders.
What to do if my extender is not working?
The extender not working issue can be resolved with the help of these tips:
- Reboot your extender.
- Place the extender in a zero interference zone.
- Reduce the distance between your extender and the existing router.
- Reset the extender (if needed).
Can I use router as a WiFi extender?
You cannot set up a router as a WiFi extender but can enable the Extender Mode feature on it. For this you need to have two routers at home so that the first one serves as the router and second one repeats the WiFi signal.