Netgear Nighthawk Extender Setup: Deep Installation Guide
Extenders & boosters are used to boost the current connected home router signals throughout your home. It’s easy to set up the most famous WiFi range extender from the Netgear Nighthawk with your router.
Here, all the Netgear nighthawk extender setup methods are available. Even if these steps are not helping, you can reach out to our experts to make the setup complete. So, let’s dive into the Netgear extender setup.
Netgear Nighthawk Extender Setup
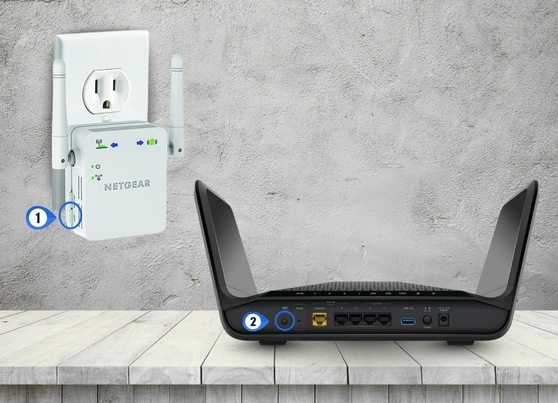
The first thing you should do is take out the extender and its user manual from the content box and plug it into the wall socket near the host router.
Then, you can choose one of the Netgear Nighthawk extender setup methods to connect it with your home router.
WPS (WiFi Protected Setup) Connection
This is the majorly used method to connect the extender with router without any cable. This WPS guide explains how to setup the extender with WPS method:
- Plug the extender nearby the WiFi router and turn it on.
- Press the WPS button on the extender once.
- A green light will begin to flicker on the Extender’s WPS LED.
- On the router, you should see the same WPS button, press it.
- The extender will stop blink, show solid green light, means the connection is established.
To connect with the extended network, you need to use the router SSID WiFi password.
Manual Setup (Mywifiext.net)
Most of the WiFi expert advice to use this manual setup to connect your extender with the router. This simple but should be done correctly. Have a close look at the WiFi extender setup manually:
- Power the extender on within the reach of the home WiFi router.
- Connect a computer with the extender’s network via Ethernet cable or SSID.
- Go into any updated browser in your computer and search the Mywifiext.net or mywifiext.local or 192.168.1.250.
- These URLs will take you to the Netgear Genie wizard login page, where you have to click NEW EXTENDER SETUP.
- The next page named Create Netgear Account will appear. Here, enter the details like Email ID, password, answer two security questions.
- After creating the account, you will access the interface. Inside, you need to search and select the router’s network.
- Enter the router password, click Continue, and on next page, type the Netgear extender new SSID username and password.
- You can also choose the router’s SSID password same with the extended network.
Finish the Netgear Nighthawk Extender setup and connect with the extended network with the help of the new SSID credentials.
Nighthawk App (Mobile Phone)
This setup method is for those users who wants to configure the extender with phone. Yes, it is possible because of the Netgear Nighthawk app. Just use these steps to download, access, and install the extender with Nighthawk app.
- Download the Nighthawk app from the Play Store or App store in your mobile device.
- Open the app and log into the app with the any Netgear account credentials.
- If there is no account, create one with the help of the Email ID, password and answering the two security questions.
- Then, you will reach inside the app dashboard, and here you have to select the “Extender” option.
- Next, the app instructs you to connect with the extender’s network (netgear_ext) via WiFi using SSID.
- After the connection, the next page will display and will ask you to enter the new extended network details.
Complete the Netgear Nighthawk extender setup and the extender will start to reboot. Remember, don’t interrupt the reboot process by turning it off.
Physical Setup (Ethernet Cable)
One more setup procedure which is rarely used even several wireless feature of the extender. If the user didn’t want to connect extender Wirelessly, Ethernet cable connection is surely help. Use these steps to link the extender with your home router.
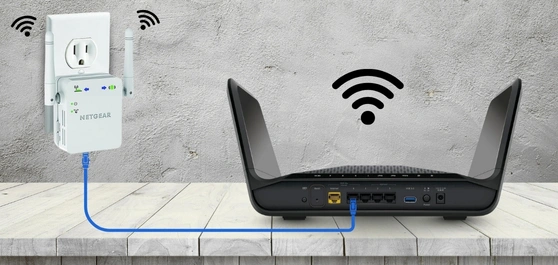
- Place the Netgear WiFi extender near the host router.
- Plug the Ethernet cable’s end into the extender’s port.
- And connect the other end into the router’s LAN port.
- Turn the devices on and configure them with the help of the interface mywifiext.net.
Note: To connect the computer or laptop with the extender network you need to select the Netgear_EXT network name in the WiFi settings.
Now that you have learned all the Netgear Nighthawk extender setup, you should also learn troubleshooting tips to make the setup error free. One of the biggest issues that users rarely face is Netgear Nighthawk extender not working, let’s have a look why it occurs and how to resolve it.
Why My Netgear Extender Not Working?
- Extender is not connected with power
- Router and extender not connected
- Netgear extender firmware has expired
- Extender is not placed on an optimal location
- Extender is facing multiple issues and need a reset
Troubleshooting Netgear Extender Not Working
Check Netgear Extender Getting Power
Make sure the extender is properly plugged into the power socket and getting proper power. If the socket is faulty and damaged, then use any other wall socket near the router.
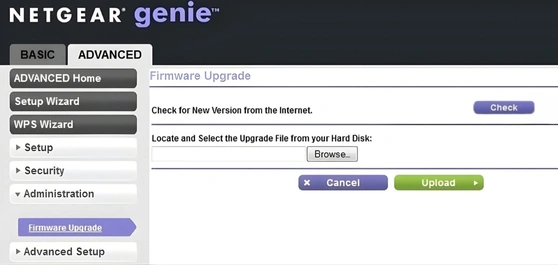
Check for the New Firmware Update
Updating the extender will fix a lot of glitches, bugs and add new features. To update the extender manually, access the interface and go into the Firmware tab. Check for UPDATE and install it in your extender.
Check Router with Extender Connection
The router and extender connect via cable or WPS. Make sure they are connected and working fine. If the extender isn’t linked, establish the connection again with the help of the app, interface, or WPS.
Choose Another Optimal Location
The location of the extender might be causing this nighthawk extender not working issue. So, try to close the distance of the router to extender and make sure there are no electronic device is nearby.
Reset Netegar Nighthawk Extender
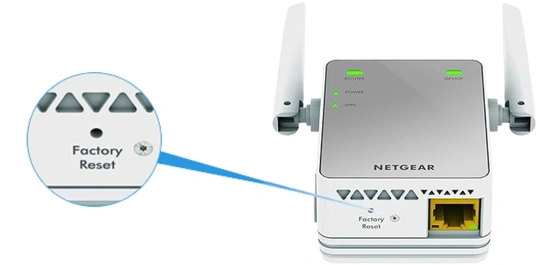
Reset will fix it surely, because this process wipes out all the data from the device. Then you have to configure it all from choosing any setup method. Use these steps to reset the device:
- Find the reset button at the side panel.
- Hold down the button’s pinhole for ten seconds
- The device will reset in just a few minutes.
- After that, set up the Netgear Nighthawk extender again.
Frequently Asked Questions
It’s easy, just follow a few simple steps:
- Log into the extender interface through the mywifiext.net.
- Go into the Wireless Settings & open SSID option.
- Enter the new password and SAVE it.
To manually update the Netgear extender, you need to download the latest file from the support website. Then install it through the mywifiext genie interface on your computer.
To set the update firmware on automatic, you need to access the Nighthawk app, go into the Firmware tab, and enable the Automatic.